
How to make AI UGC ads: from brief to video
Build a creator-style ad from a clear brief, an approved avatar and product references, then review the result before you launch.
By Janice Phil · Growth · Published
In this article
Start with one buying question
To make an AI UGC ad, prepare your product references, write a short script, choose an avatar and generation mode, render a scene, then review the picture and audio before assembling the final creative. AI UGC means creator-style content made with AI. It does not mean a real customer filmed a testimonial.
Begin with the question the ad must answer. For a travel bottle, that might be whether the cap opens with one hand. A useful brief asks the viewer to notice one observable detail and take one next step. A vague request to make a viral ad gives you no clear acceptance test.
This walkthrough describes the controls available in roasOS’s public demo and a suggested production process. The travel-bottle script is an illustrative brief, not a published campaign or a claim about a specific product.
Prepare the product and person
Use a clean front view and any additional angle needed for the action. Include the cap, label and approximate scale. If the scene requires a person to hold the product, a reference showing the intended grip can be more useful than another beauty shot. Do not expect a model to infer a mechanism hidden behind the packaging.
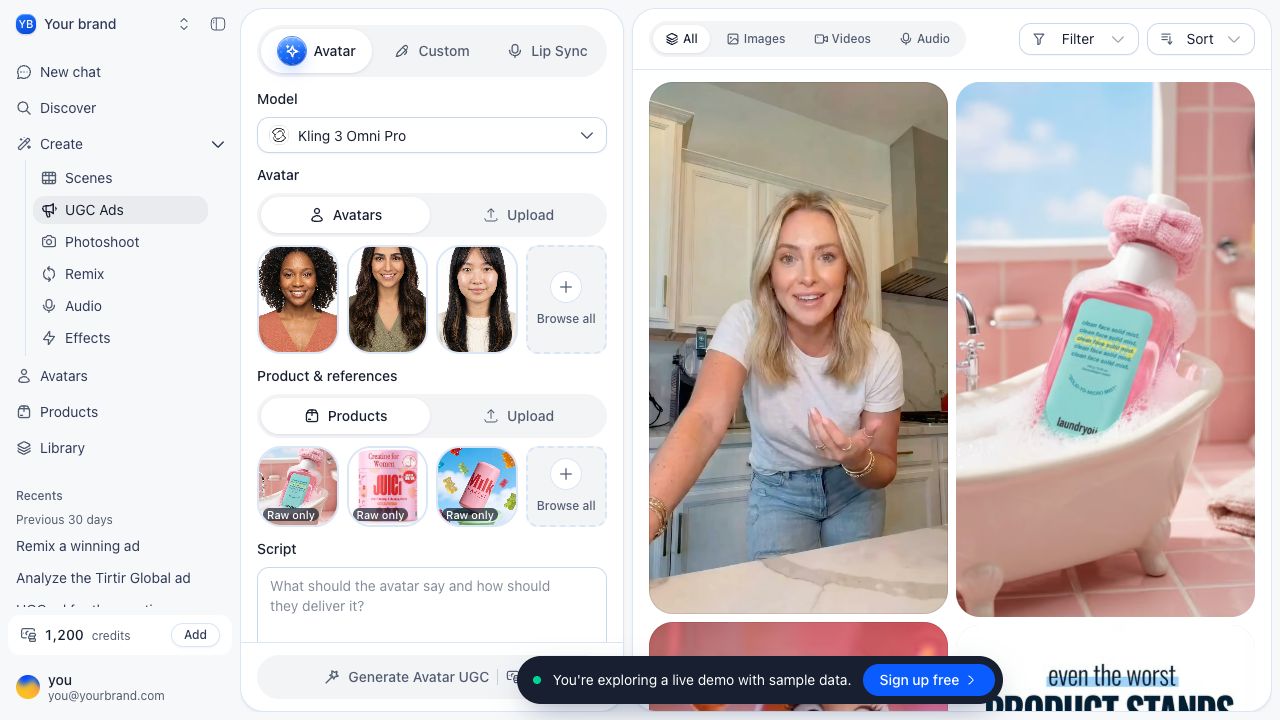
Choose an avatar you are permitted to use, or upload an authorized reference. Keep the wardrobe, setting and framing in the brief. roasOS’s UGC workspace offers Avatar, Custom and Lip Sync modes; the inputs and available settings change with the mode and model.
Write a scene that can fit the duration
Read the script aloud before generating. Leave time for the physical action instead of filling the entire clip with speech. A short clip is often one beat in a longer ad, so plan the edit before trying to force the full story into one render.
| Beat | Illustrative line | Picture |
|---|---|---|
| Opening | “Watch the cap when I pick this up.” | Bottle in frame from the first moment |
| Demonstration | “One hand to open it.” | Show the action only if true for the product |
| Next step | “See the sizes and colors.” | Product close-up and a clear destination |
Choose the mode and generate a first scene
Open UGC Ads. In Avatar mode, select a library avatar or upload an image, add a product or reference, and enter the script. Choose an available model, duration, ratio and quality. Check the audio option when the model offers it. The displayed credit estimate and available combinations are the ones to use for your job.
For Custom mode, start from the scene image and instructions the interface requests. Lip Sync is a different path for matching a face or video with speech. Do not assume one mode accepts every reference type or that all models support the same lengths. Use the live controls rather than copying old settings from a tutorial.
Generate one scene first. If the label shifts or a hand passes through the bottle, simplify the movement or use a product cutaway. Repeatedly adding adjectives to the same prompt is less useful than identifying the specific failure.
Review the output before making variants
Watch at normal speed with sound, then inspect the product interaction frame by frame. Check face continuity, fingers, packaging, speech, pauses and the opening crop. Review captions separately; correct wording is not guaranteed by a good-looking video.
Assemble the approved scene with any needed product footage, captions and end card in your chosen editor. Check the final export on a phone and in the intended placement. A successful render is a production milestone, not evidence that an ad will convert.
- Keep a copy of the input, prompt, selected model and output.
- Change one creative variable when making a controlled comparison.
- Use supported product claims and never write an invented customer experience for an AI actor.